Sharing files between Windows PCs on the same network is a practical way to collaborate and transfer data without external storage devices. This guide provides a step-by-step approach to set up file sharing using built-in Windows features, ensuring a secure and efficient process.
Prerequisites
Before initiating file sharing:
- Ensure all PCs are connected to the same network: Verify that each computer is connected to the same Wi-Fi or Ethernet network.
- Set network profiles to ‘Private’: This setting allows for easier discovery and sharing between devices.
- Windows 11:
- Navigate to Settings > Network & Internet > Wi-Fi (or Ethernet).
- Click on the connected network and select Private Network.
- Windows 10:
- Go to Settings > Network & Internet > Status.
- Click on Change connection properties and choose Private.
- Windows 11:
- Enable Network Discovery and File Sharing:
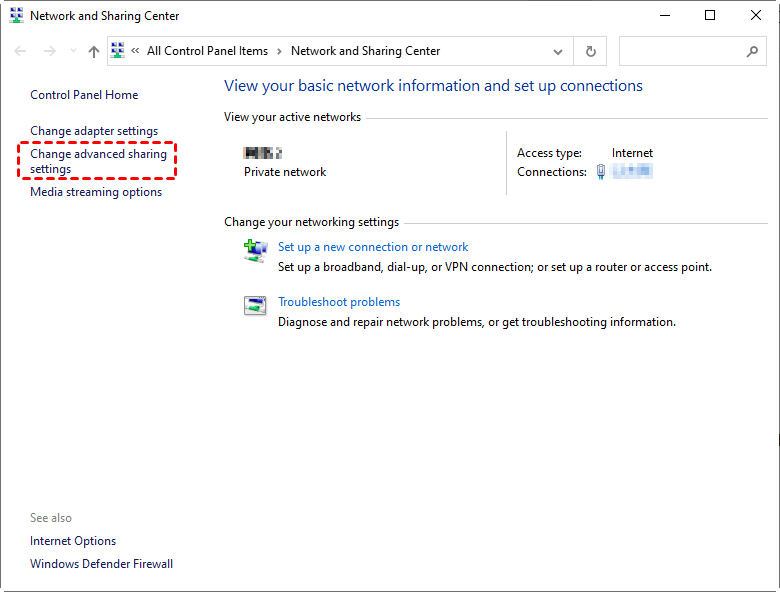
- Open Control Panel > Network and Sharing Center > Change advanced sharing settings.
- Under the Private profile, turn on:
- Network discovery
- File and printer sharing
- Click Save changes.
Method 1: Sharing Files via File Explorer
- Select the Folder to Share:
- Right-click on the folder you wish to share and select Properties.
- Navigate to the Sharing tab.
- Click on Share.
- Choose People to Share With:
- In the dropdown menu, select Everyone for broad access or specify individual user accounts.
- Click Add.
- Set Permission Levels:
- Choose the desired permission level:
- Read: Users can view files.
- Read/Write: Users can view and modify files.
- Choose the desired permission level:
- Finalize Sharing:
- Click Share and then Done.
- Access Shared Folder from Another PC:
- Open File Explorer.
- In the address bar, type \\ComputerName\SharedFolderName and press Enter.
- Replace ComputerName with the name of the PC sharing the folder and SharedFolderName with the name of the shared folder.
Method 2: Using Nearby Sharing
Nearby Sharing allows for quick file transfers between Windows 10 and 11 PCs using Bluetooth and Wi-Fi.
- Enable Nearby Sharing:
- On both PCs, go to Settings > System > Nearby sharing.
- Toggle Nearby sharing to On.
- Choose Everyone nearby for broader sharing.
- Share a File:
- Right-click on the file you wish to share and select Share.
- In the sharing window, select the target PC from the list.
- Accept the File on the Receiving PC:
- A notification will appear on the receiving PC.
- Click Save & Open or Save to complete the transfer.
Method 3: Mapping a Network Drive
Mapping a network drive allows for easy access to shared folders.
- Open File Explorer:
- Click on This PC.
- Select Map network drive from the top menu.
- Assign Drive Letter and Folder Path:
- Choose a drive letter from the dropdown.
- In the Folder field, enter the path to the shared folder (e.g., \\ComputerName\SharedFolderName).
- Authenticate if Prompted:
- Enter the username and password of the PC sharing the folder.
- Finish Mapping:
- Check Reconnect at sign-in if you want the drive to be available after restarting
- Click Finish.
Method 4: Using OneDrive for Cloud Sharing
For sharing files across devices via the cloud:
- Upload Files to OneDrive:
- Move or copy files to your OneDrive folder.
- Access Files on Another PC:
- Sign in to the same OneDrive account on the other PC.
- Files will sync automatically, allowing access from the OneDrive folder.
Troubleshooting Tips
- Shared Folder Not Accessible:
- Ensure both PCs are on the same network and have network discovery enabled.
- Verify that the folder is shared with the correct permissions.
- Prompted for Network Credentials:
- Enter the username and password of the PC hosting the shared folder.
- Ensure that password-protected sharing is configured appropriately.
- Firewall Blocking Access:
- Temporarily disable firewall settings to test connectivity.
- Ensure that file and printer sharing is allowed through the firewall.
Conclusion
Sharing files between Windows PCs on the same network is streamlined through built-in features like File Explorer sharing, Nearby Sharing, and network drive mapping. By following the steps outlined above, you can facilitate efficient and secure file transfers without the need for external storage devices or third-party applications.