Finding a virus on your Windows PC can be alarming. Many users immediately think of installing a third-party antivirus program. However, did you know that Windows itself provides robust built-in tools that can be highly effective in detecting and removing malware? This guide will show you how to remove a virus from Windows without antivirus software you have to purchase or install.
The history of malware is as old as personal computing itself, with early examples like the “Elk Cloner” virus for Apple II in 1982. As operating systems like Microsoft Windows became ubiquitous, so did the sophistication of viruses, worms, and trojans. For decades, third-party antivirus software was the primary defense. However, with the introduction of Windows Defender (now Windows Security) in Windows Vista and its significant enhancements in Windows 8, 10, and 11, Microsoft has provided a comprehensive and highly capable security solution directly integrated into the operating system. This means you often have the tools you need already at your fingertips.
This guide focuses on leveraging these integrated Windows security features and fundamental troubleshooting techniques to clean an infected system, without relying on additional downloads or subscriptions.
Understanding Malware and Why It’s a Problem
Before diving into removal, it’s important to understand what malware is and why it poses a threat. Malware (malicious software) is a broad term encompassing viruses, worms, Trojans, ransomware, spyware, adware, and other unwanted programs designed to disrupt computer operations, gather sensitive information, or gain unauthorized access.
Signs of a malware infection include:
- Slow performance: Your PC becomes unusually slow, crashes frequently, or programs take a long time to open.
- Pop-up ads: Excessive or unwanted pop-up advertisements appear, even when not Browse.
- Browser redirects: Your web browser is redirected to unfamiliar websites.
- Missing files or changed settings: Files disappear, or your desktop background, homepage, or other settings change without your input.
- Suspicious network activity: High network usage when you’re not actively using the internet.
- Disabled security tools: Your existing antivirus or firewall is turned off or can’t be updated.
Preparation: Crucial First Steps
Before attempting any removal, these steps are vital to prevent further damage and improve your chances of success.
- Disconnect from the Internet:
- Unplug your Ethernet cable or turn off your WiFi.
- This prevents the malware from spreading to other devices, sending your data out, or downloading more harmful components. It also stops ransomware from communicating with its command and control servers.
- Backup Important Files (If Possible and Safe):
- If you can still access your files and suspect the infection isn’t ransomware (which encrypts files), try to back up your most critical documents, photos, and personal data to an external drive or cloud storage.
- Important: Be extremely cautious. If you suspect ransomware, backing up encrypted files is pointless, and backing up active malware could reinfect your clean backup device. This step is best skipped if you’re unsure of the malware type.
- Gather Necessary Information:
- If you need to download drivers or other tools later, make sure you have another device (smartphone, another PC) with internet access available.
Step 1: Boot into Safe Mode
Safe Mode starts Windows with only essential programs and drivers. This often prevents malware from loading, making it easier to remove.
- Restart your PC into Safe Mode:
- Windows 11/10:
- Press Windows key + I to open Settings.
- Go to System > Recovery.
- Under “Recovery options,” next to “Advanced startup,” click “Restart now.”
- After your PC restarts, select “Troubleshoot” > “Advanced options” > “Startup Settings” > “Restart.”
- After the next restart, you’ll see a list of options. Select “4” or “F4” for Safe Mode, or “5” or “F5” for Safe Mode with Networking (choose this if you must have internet for a tool, but ideally avoid it during removal).
- Windows 8.1/8:
- Press Windows key + I to open the Charms bar, then click “Change PC settings.”
- Go to “Update and recovery” > “Recovery.”
- Under “Advanced startup,” click “Restart now.”
- Follow the same “Troubleshoot” > “Advanced options” > “Startup Settings” > “Restart” process as Windows 10.
- Windows 7:
- Restart your computer.
- As it starts booting up, repeatedly press the F8 key (about once per second) until the “Advanced Boot Options” menu appears.
- Use the arrow keys to select “Safe Mode” or “Safe Mode with Networking” and press Enter.
- Windows 11/10:
- Log in: Log into your user account. If prompted, use your password.
Step 2: Delete Temporary Files and Unwanted Programs
Malware often hides in temporary folders or installs unwanted programs. Cleaning these out can remove components of the infection.
- Delete Temporary Files:
- Run Disk Cleanup: Type “Disk Cleanup” into the Windows search bar (or Start Menu search) and select the application.
- Choose your C: drive (or the drive where Windows is installed) and click “OK.”
- Check the boxes for “Temporary Internet Files,” “Temporary files,” “Recycle Bin,” and anything else you don’t need.
- Click “OK” and then “Delete Files.”
- For a deeper clean (Windows 10/11), go to Settings > System > Storage > Temporary files, select unwanted items, and click “Remove files.”
- Uninstall Suspicious Programs:
- Windows 11/10: Go to Settings > Apps > Apps & features.
- Windows 8.1/7: Go to Control Panel > Programs > Programs and Features.
- Sort programs by “Install date” to see recently added software.
- Look for any programs you don’t recognize, didn’t intentionally install, or that have suspicious names.
- Select the program and click “Uninstall.” Follow any uninstallation prompts.
Step 3: Use Windows Security (Built-in Antivirus)
Windows Security (known as Windows Defender in earlier versions of Windows 10 and Microsoft Security Essentials on Windows 7) is Microsoft’s robust, built-in antivirus solution. It runs silently in the background and is highly capable of detecting and removing common malware.
- Open Windows Security:
- Windows 11/10: Type “Windows Security” into the Windows search bar and open the application.
- Windows 7/8.1 (Microsoft Security Essentials): Search for “Microsoft Security Essentials” in the Start Menu.
- Perform an Offline Scan (Highly Recommended for Stubborn Infections):
- An offline scan runs before Windows fully loads, making it effective against malware that tries to hide or disable antivirus software while Windows is running.
- In Windows Security, go to “Virus & threat protection.”
- Click “Scan options.”
- Select “Microsoft Defender Offline scan” and click “Scan now.”
- Your PC will restart and perform a scan, which can take about 15 minutes. It will then restart again into Windows.
- Perform a Full Scan (If Offline Scan isn’t an option or for thoroughness):
- In “Virus & threat protection,” click “Scan options.”
- Select “Full scan” and click “Scan now.” This scan is very thorough and can take several hours depending on your hard drive size and the number of files.
- Let the scan complete. If any threats are found, Windows Security will typically recommend “Remove,” “Quarantine,” or “Allow.” Always choose “Remove” or “Quarantine” for detected malware.
Step 4: Check Startup Items and Services
Some malware configures itself to launch automatically with Windows. Disabling these startup items can prevent the virus from running.
- Open Task Manager (Startup tab):
- Right-click on the Taskbar and select “Task Manager” (or press Ctrl + Shift + Esc).
- Go to the “Startup” tab (Windows 10/11) or “Processes” tab (Windows 7/8.1, then look for unusual processes).
- Look for any suspicious programs with unknown publishers or unusual names. Right-click and select “Disable.” If unsure, search online for the program name before disabling.
- Check Services (Advanced):
- Type “services.msc” into the Windows search bar and press Enter.
- Look for any unfamiliar services with suspicious names or descriptions.
- Right-click on a suspicious service, go to “Properties,” and set its “Startup type” to “Disabled.” Do not stop essential Microsoft services unless you know what you are doing. This step is for advanced users.
Step 5: Modify Host Files (If Redirected Websites are an Issue)
Some malware alters the Hosts file to redirect your browser to malicious websites.
- Open Notepad as Administrator:
- Search for “Notepad” in Windows search.
- Right-click on “Notepad” in the results and select “Run as administrator.”
- Open the Hosts file:
- In Notepad, click File > Open.
- Navigate to C:\Windows\System32\drivers\etc
- In the “File name” box, type *.* and press Enter, then select “hosts” (no extension).
- The Hosts file will open. Look for any entries at the bottom that redirect legitimate websites (like Google, Facebook, banking sites) to unusual IP addresses. Legitimate entries usually start with #.
- Delete any suspicious lines that don’t start with #.
- Save the file and close Notepad.
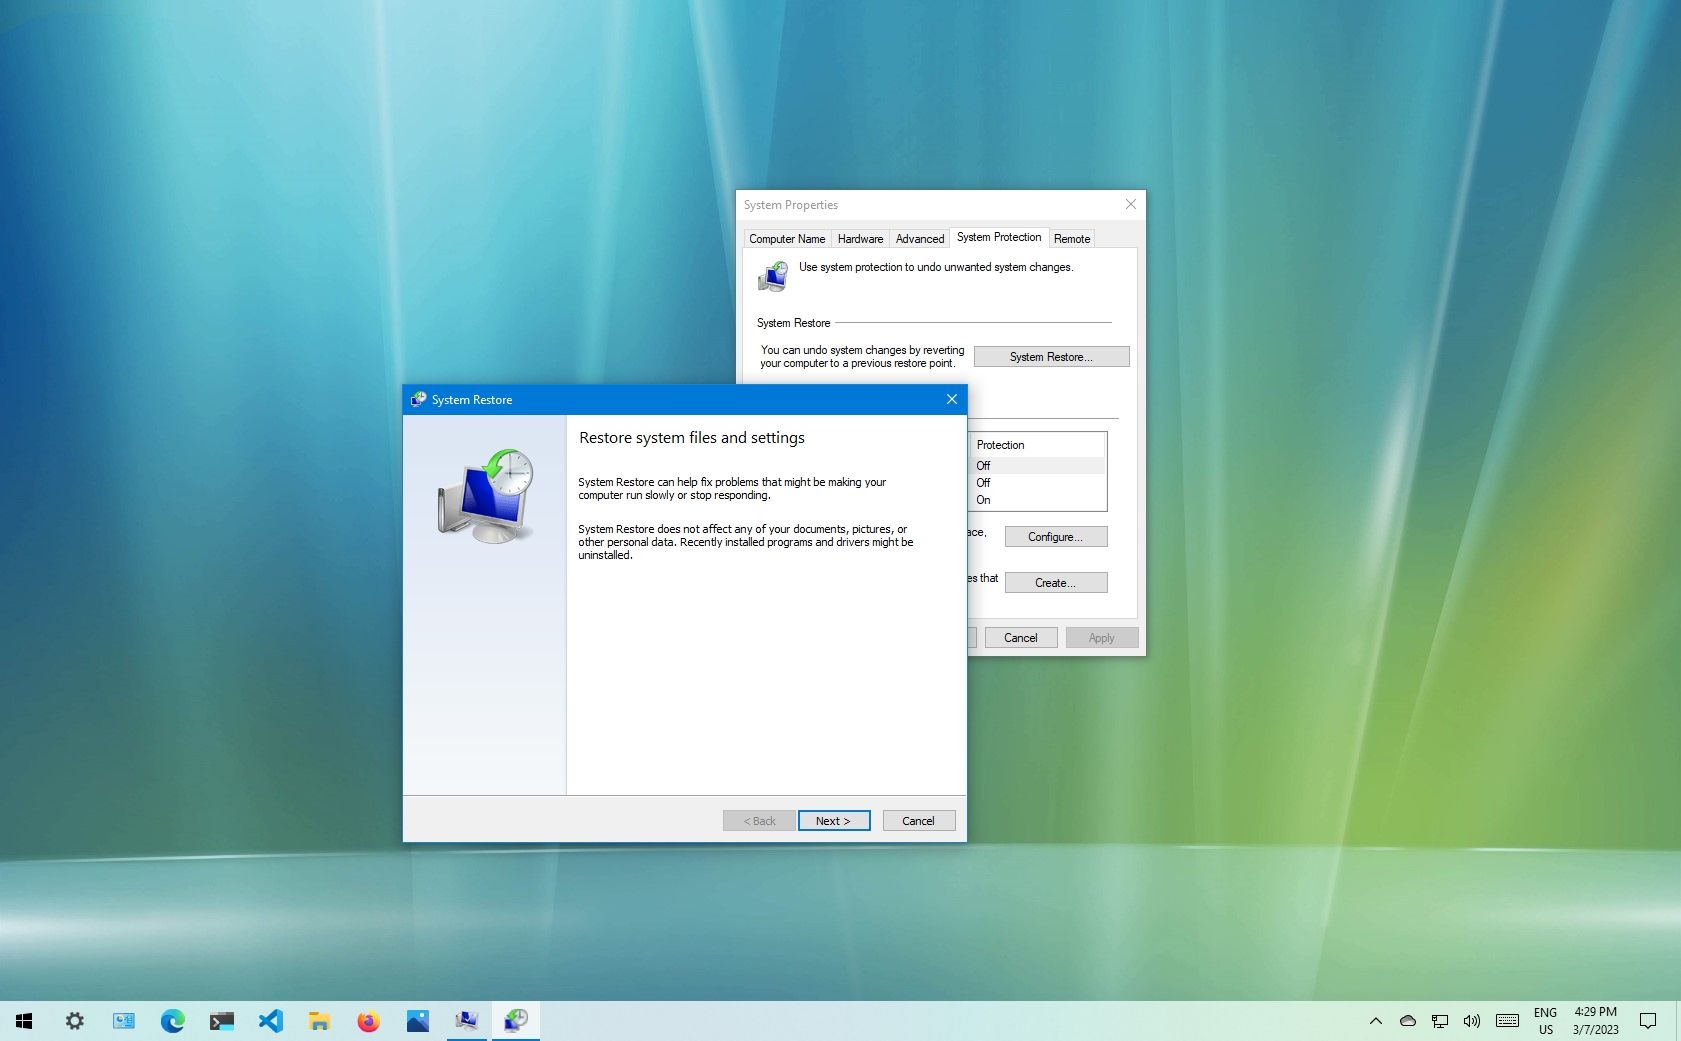
Step 6: Perform a System Restore (If Recent Infection)
If the virus infection is recent and you have System Restore enabled, you can revert your system to a previous point in time when it was clean. This can effectively undo changes made by the malware.
- Open System Restore:
- Type “Create a restore point” into the Windows search bar and select the result.
- Click the “System Restore…” button.
- Choose a restore point:
- Click “Next.”
- Select a restore point from before you suspect the infection occurred.
- Click “Next” and then “Finish.”
- Your PC will restart and revert to the selected state. Your personal files will not be affected, but programs installed after the restore point will be removed.
Step 7: Reset Your Browser Settings
Many adware and spyware infections target web browsers. Resetting your browser to its default settings can remove unwanted toolbars, extensions, and homepage hijackers.
- Google Chrome: Open Chrome, type chrome://settings/reset in the address bar, and click “Restore settings to their original defaults.”
- Mozilla Firefox: Open Firefox, type about:support in the address bar, and click “Refresh Firefox…” (top right).
- Microsoft Edge: Open Edge, go to Settings > Reset settings > “Restore settings to their default values.”
- Internet Explorer (if still used): Go to Control Panel > Internet Options > “Advanced” tab > “Reset…”
Final Step: Reassess and Secure Your PC
After attempting these removal steps, reconnect to the internet (if you disconnected).
- Update Windows: Ensure your Windows operating system is fully updated. Go to Settings > Update & Security (Windows 10) or Windows Update (Windows 11) and check for updates. Microsoft regularly releases security patches.
- Update Windows Security Definitions: Manually update the virus definitions for Windows Security by opening the app, going to “Virus & threat protection,” and checking for updates under “Virus & threat protection updates.”
- Run a final Full Scan: Once definitions are updated, run another Full scan with Windows Security.
- Consider a Clean Windows Installation (Last Resort): If all else fails, and your PC remains infected or unstable, the most definitive way to remove a virus is a clean installation of Windows. This means erasing your entire hard drive and reinstalling the operating system from scratch. This will delete all your files and installed programs, so ensure you have backed up any critical data beforehand.
- Windows 11/10: Go to Settings > System (or Update & Security) > Recovery > Reset this PC > “Remove everything.” Choose “Cloud download” for a fresh image.
- For older versions or if the system is unbootable, you might need to use Windows installation media (USB or DVD).
While these methods are powerful, prevention is always better than cure. Keep your Windows operating system and browsers updated, be cautious about opening suspicious email attachments, avoid clicking questionable links, and download software only from trusted sources.
Frequently Asked Questions (FAQ)
Q1: Is Windows Security (Windows Defender) good enough to protect against viruses?
Yes, Windows Security has significantly improved over the years and is now considered a highly capable antivirus solution. For most home users, it provides excellent real-time protection against common malware, including viruses, ransomware, and spyware. Keeping it updated is key.
Q2: What’s the difference between a virus, a worm, and a Trojan?
- A virus attaches itself to legitimate programs and spreads when those programs are executed. It requires user interaction to propagate.
- A worm is a standalone malware program that replicates itself and spreads across computer networks without human interaction.
- A Trojan horse (or Trojan) is a type of malware disguised as legitimate software. Users are tricked into installing it, and once inside, it can perform various malicious activities like creating backdoors or stealing data.
Q3: Can a virus hide from Safe Mode?
While Safe Mode is highly effective because it loads minimal drivers and programs, some very sophisticated rootkits or advanced malware might still be able to run or hide. However, for most common viruses, Safe Mode severely limits their capabilities, making them easier to detect and remove with Windows Security.
Q4: How do I prevent future virus infections?
- Keep Windows and all your software (browsers, applications) updated.
- Use Windows Security with real-time protection enabled and ensure its virus definitions are up to date.
- Be cautious about email attachments and suspicious links.
- Download software only from trusted, official sources.
- Use a strong, unique password for your user account.
- Consider using a standard user account for daily tasks instead of an administrator account to limit malware’s potential impact.
- Regularly back up your important data.
Q5: What if my Windows PC won’t boot at all due to a virus?
If your PC won’t boot into Safe Mode or regular Windows:
- You’ll need Windows installation media (a USB drive or DVD with Windows on it).
- Boot from the media.
- Choose “Repair your computer” instead of “Install now.”
- From the Advanced Startup Options, you might be able to access System Restore, Command Prompt (to run SFC/DISM if your Windows installation is still somewhat intact), or the Reset this PC option (if available for your Windows version).
- A clean reinstall of Windows is often the most reliable solution in severe unbootable scenarios, as mentioned in the guide.