In the modern digital age, text-based communication often benefits from a touch of visual expression. Whether you’re sending an email, typing in a document, or chatting online, emojis and kaomoji add personality, clarify tone, and convey emotions that plain text cannot. While smartphones have made using these graphical elements effortless, many Windows users might not realize that a powerful, built-in emoji picker and kaomoji selector is readily available through a simple keyboard shortcut.
The integration of an emoji picker into Windows dates back to the Fall Creators Update for Windows 10, around 2017. This marked a significant step by Microsoft to keep pace with the evolving landscape of digital communication, where emojis transitioned from niche internet slang to a ubiquitous part of daily interaction. Building upon this, Windows 11 further refined the picker, adding GIFs and kaomoji (Japanese emoticons formed from text characters, like (^_^)) and a dedicated symbols tab, making it a comprehensive tool for expressive input. This guide will walk you through accessing and effectively using this versatile Windows feature.
Understanding the Windows Emoji Picker
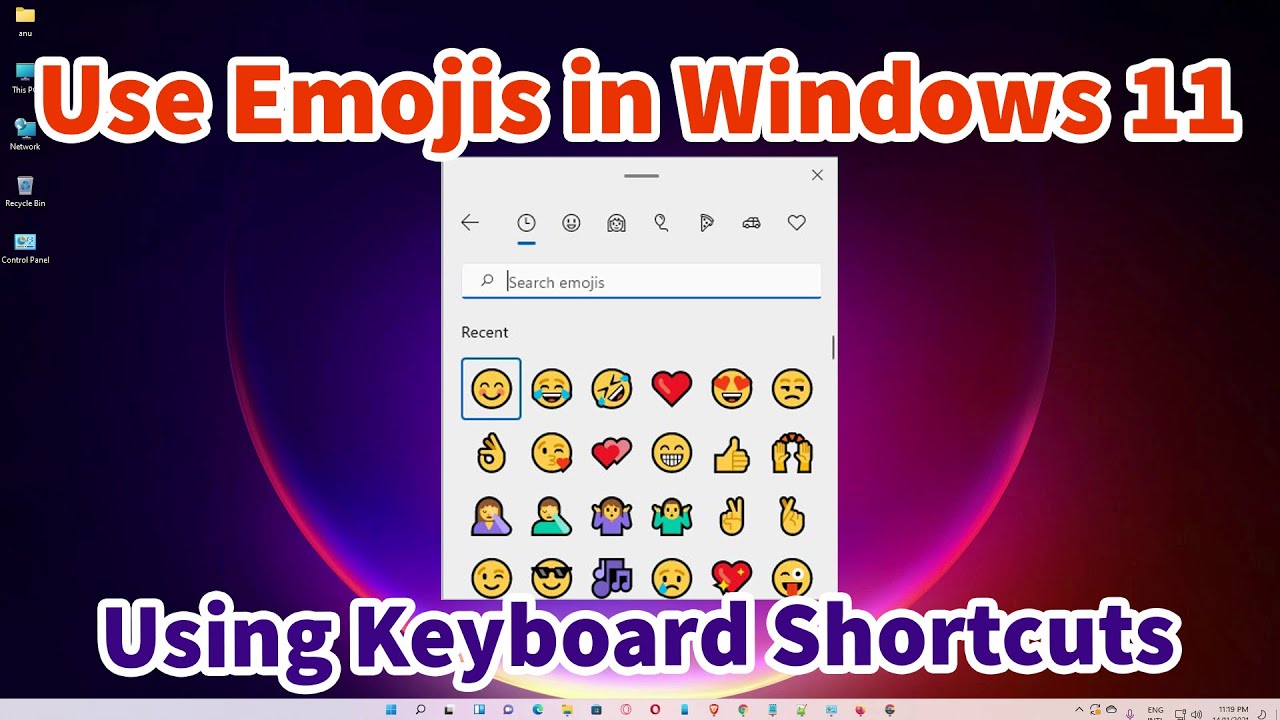
The Windows Emoji Picker (often referred to simply as the “emoji keyboard”) is a pop-up panel that allows you to easily insert:
- Emojis: The standard graphical pictograms recognized across platforms (e.g., 😂, 👍, 🏠).
- Kaomoji: Japanese-style emoticons made from text characters (e.g., (^_^), (╯°□°)╯︵ ┻━┻, ( ͡° ͜ʖ ͡°)).
- Symbols: Special characters not typically found on a standard keyboard (e.g., ©, ™, ★, ♥).
- GIFs: Animated images (available in Windows 11).
This tool works across most applications where you can type text, including web browsers, word processors, chat applications, and more.
Method 1: Accessing the Emoji Picker with Keyboard Shortcuts
The primary way to open the emoji picker is through a simple keyboard shortcut. There are two variations, and both work the same way.
Step-by-Step Guide:
- Place Your Cursor: Click into any text field or document where you want to insert an emoji, kaomoji, or symbol.
- Press the Shortcut:
- Press the Windows key + . (period/dot) simultaneously.
- OR
- Press the Windows key + ; (semicolon) simultaneously.
- A small pop-up panel will appear over your text field.
- Navigate the Picker:
- At the top of the picker, you’ll see several icons representing different categories:
- Smiley Face/Emoji icon: For emojis (default view).
- ^_^ icon: For kaomoji.
- Ω icon: For symbols.
- GIF icon: For animated GIFs (Windows 11 only).
- Click on the desired category icon to switch between them.
- At the top of the picker, you’ll see several icons representing different categories:
- Insert Emojis:
- When on the Emoji tab, you’ll see a scrollable list of emojis organized into sub-categories (e.g., Smileys & Animals, People, Food & Drink, Travel & Places).
- You can also use the search bar at the top of the picker to quickly find emojis by typing keywords (e.g., “cat,” “heart,” “happy”).
- Click on an emoji to insert it into your text. The picker will usually close automatically after selection.
- Tip: Some emojis have different skin tone variations. After selecting a base emoji (e.g., a hand), click on it again, and a small pop-up will appear with skin tone options.
Method 2: Using Kaomoji from the Picker
Kaomoji offers a different flavor of expression, using characters to form faces and actions.
Step-by-Step Guide:
- Open the Emoji Picker: Use Windows key + . or Windows key + ;
- Select the Kaomoji Tab: Click the ^_^ icon at the top of the picker.
- Browse and Insert Kaomoji:
- The kaomoji are organized into categories like “Happy,” “Greetings,” “Sad,” “Surprise,” etc.
- Click on a category to expand it and see the available kaomoji.
- Click on the desired kaomoji to insert it into your text.
Method 3: Inserting Symbols and Special Characters
The Symbols tab provides quick access to a wide range of characters that are often hard to type directly.
Step-by-Step Guide:
- Open the Emoji Picker: Use Windows key + . or Windows key + ;
- Select the Symbols Tab: Click the Ω icon at the top of the picker.
- Browse and Insert Symbols:
- Symbols are organized into categories like “Punctuation,” “Currency,” “Math Symbols,” “Latin Symbols,” etc.
- Click on a category to see its symbols.
- Click on the desired symbol to insert it into your text.
Method 4: Inserting GIFs (Windows 11 Only)
For Windows 11 users, the picker also integrates with a GIF library for quick animated image insertion.
Step-by-Step Guide:
- Open the Emoji Picker: Use Windows key + . or Windows key + ;
- Select the GIF Tab: Click the GIF icon at the top of the picker.
- Search and Insert GIFs:
- Use the search bar to find GIFs by keywords (e.g., “yes,” “no,” “celebrate”).
- Click on a GIF to insert it into your text.
- Note: GIF support may vary by application. Some applications might display them as static images or not at all, depending on their functionality.
Customization and History
The Windows Emoji Picker also offers some handy features:
- Recently Used: The first tab (often a clock icon) shows your recently used emojis, kaomoji, and symbols, making it easy to re-use your favorites quickly.
- Search Functionality: The search bar at the top is incredibly useful for finding specific emojis or symbols without endless scrolling.
- Clipboard History Integration: While not directly part of the emoji picker, pressing Windows key + V opens the Clipboard History, which stores multiple copied items, including emojis and symbols, allowing you to paste previous items.
By mastering the Windows key + . (or Windows key + 😉 shortcut, you unlock a powerful built-in tool that significantly enhances your ability to express yourself and insert special characters in any text field on your Windows PC.
FAQ
Q1: What is the main keyboard shortcut to open the emoji picker in Windows?
A1: The main keyboard shortcut to open the emoji picker in Windows is Windows key + . (period/dot) or Windows key + ; (semicolon). Both shortcuts achieve the same result.
Q2: Does the emoji picker work in all applications?
A2: The emoji picker is designed to work in most text input fields across Windows. This includes web browsers, Microsoft Office applications (Word, Excel, PowerPoint), Notepad, chat applications, and many other third-party programs. However, the rendering of emojis or GIFs might vary slightly depending on the application and its support for Unicode characters or animated content.
Q3: What are Kaomoji, and how are they different from regular emojis?
A3: Kaomoji (顔文字) are Japanese emoticons created using text characters and punctuation marks, designed to be read horizontally (e.g., (^_^), (╯°□°)╯︵ ┻━┻). They are distinct from emojis, which are standardized graphical pictograms. The Windows emoji picker includes a dedicated tab for easily inserting various kaomoji.
Q4: Can I add custom emojis or kaomoji to the Windows picker?
A4: No, you cannot directly add custom emojis or kaomoji to the built-in Windows emoji picker. The content available in the picker is curated and updated by Microsoft through Windows updates. However, the picker does keep a “Recently Used” section, which stores the emojis, kaomoji, and symbols you’ve recently inserted, making it easy to re-access your favorites.
Q5: Why do some emojis appear as blank squares or different on other devices?
A5: Emojis can appear as blank squares (or question marks) if the font being used in the application or the operating system on the receiving device does not support that particular emoji. This usually happens when an older system or application tries to display a newer emoji. Emojis can also look slightly different across platforms (e.g., on an iPhone vs. an Android phone vs. a Windows PC) because each operating system uses its own unique set of emoji designs, even though they represent the same Unicode character.